Make a Healthier Playground

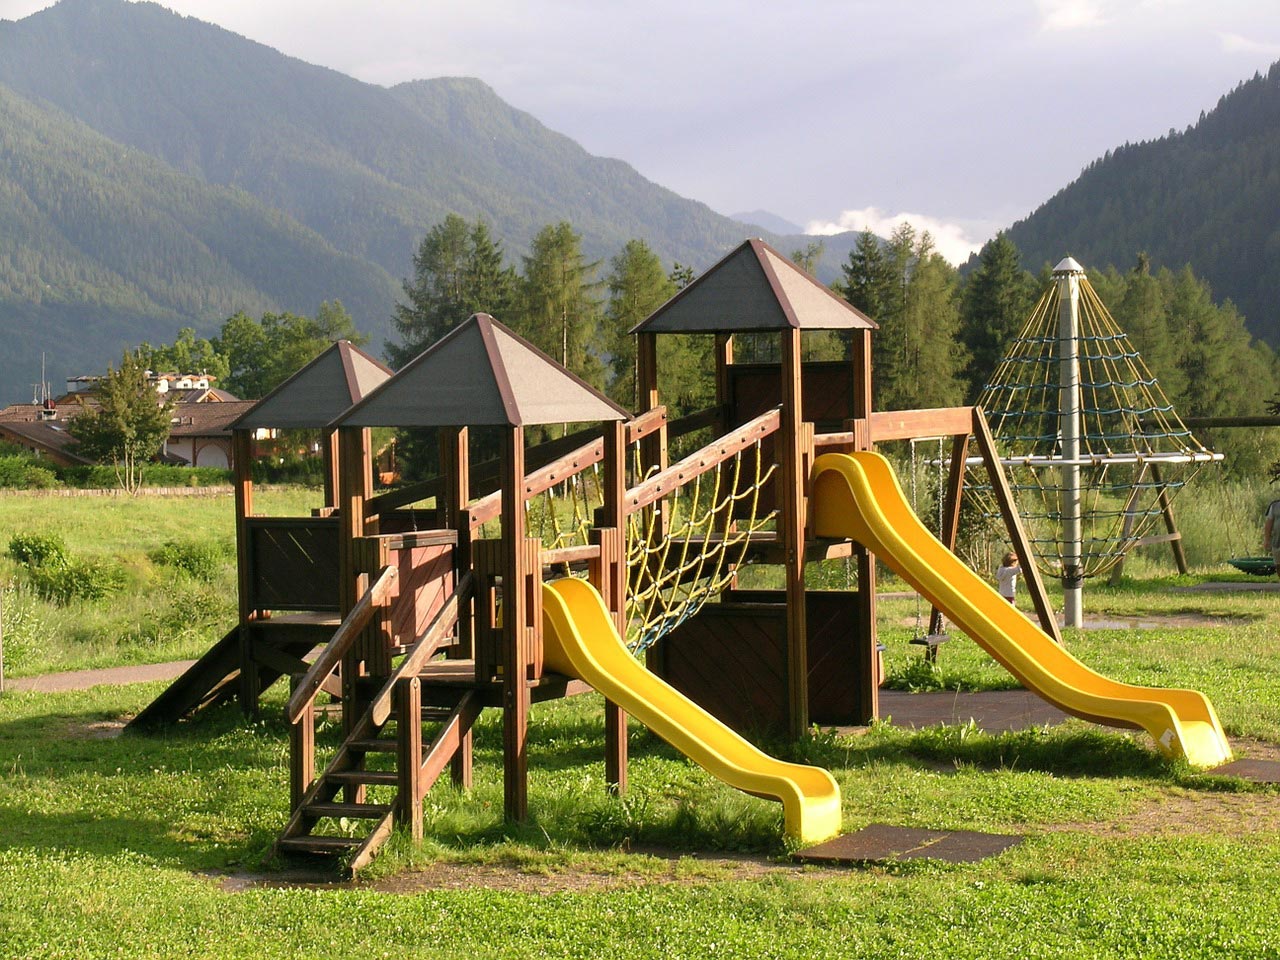
Many old playgrounds might be hiding some toxic hazards, the likes of lead paint and arsenic need to not be in children’s playgrounds and one way to ensure this is to get creative and build your own. Yes you can build some play equipment for the kids. This way you can be sure that it is safe and it is exactly what you want in the space you need it.

My kids love playing outside and creating areas for them to explore and have adventures is ideal. Unstructured outdoor time is helpful for children.

Here are some of the great benefits of unstructured play:

  • Makes kids resilient. If they hurt a foot or scrap a knee they work it out
  • Helps children cooperate with others
  • Learn to do things themselves without parents getting involved
  • Creative and role playing happens more
  • Helps brain development
  • Make friends
  • Allows children to learn. “Until at least 9 years old, a child’s learning occurs best when the whole self is involved” (http://www.stonybrook.edu/heartlinks/unstructuredplay.pdf)
  • Creates the space to allow children to be more independent
  • It is time away from parents and school – a de-stresser
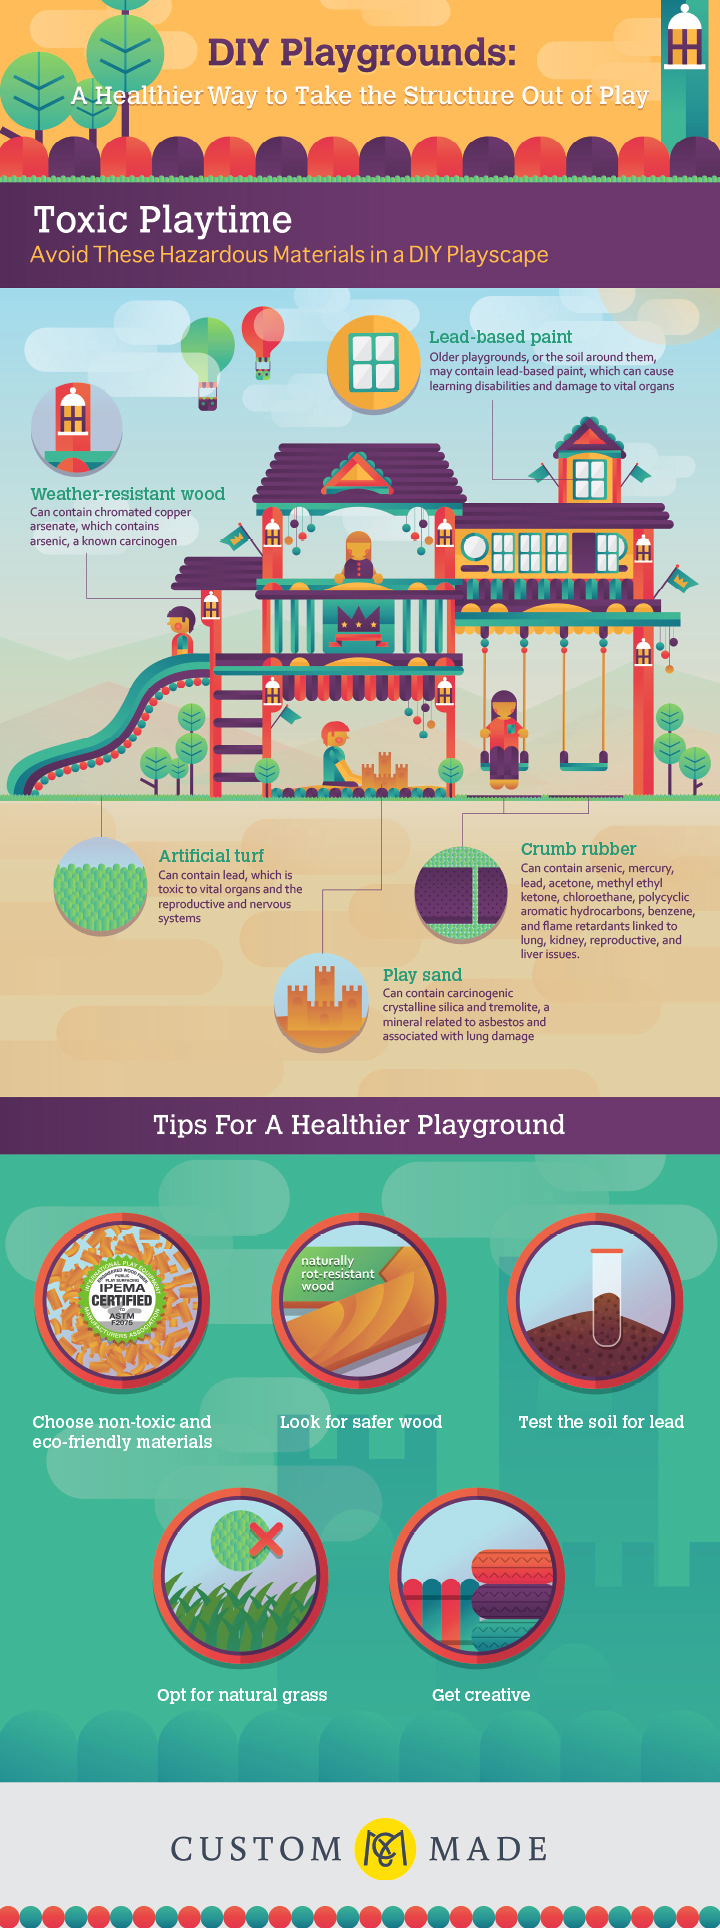
 

DIY Playgrounds

DIY Playgrounds
Infographic by CustomMade


How to create a healthier playground?

Make sure you follow these steps to ensure a great happy and healthy play area:

  • Choose safe products. Make sure before you purchase that they are the safest and best product to use for what you are creating. If you are in doubt you can visit the Product Safety Australia Website  and for playground safety guidelines in Australia Kidsafe NSW Inc , or if in America Consumer Product Safety Commission website
  • Test the soil if you are worried about lead levels
  • Steer clear of ployvinyl chloride (PVC) and volatile organic compounds (VOC’s) both of these can be harmful to humans
  • Choose manufacturers that are certified by The International Playground Equipment Manufacturers Association (IIPEMA).
  • Pick better wood or wood alternatives. Safer alternatives to CCA treated wood are: plastic, rubber lumber and composite lumber
  • Recycle your materials and be creative
  • Make sure if kids fall over the area will be soft. Aim to have soft grass if you can.
  • If your playground attracts kids from the area, make sure you have rules so it eliminates or cuas4es less accidents.
  • Before you build the structure you need to know how many kids will be using this playground. More kids might need more engineering or it might determine what types of things go in this new play area. If the kids are all the same age then something for one age group. If some are older and some are younger you will need to figure out what will make them all happy.
Create your own playground in your yard

Get some Playground Plans for Free!

Need some inspiration on what to create. Here are some plans from Total Playgrounds that will give you a helping hand. Creating something unique for your family and children is a wonderful thing. Remember that something like this cannot be built in one day, well unless you have hired a team of builders that is. So be realistic it might take a month or two but it will get done and you will have something fun and amazing the kids will love.

How about these fabulous ideas from Homedit, get creating today and turn your yard into a fun place to be. Your children will never want to come inside.

Here is another great link to Playground Equipment in New Zealand and they have some great plans that you can create in your very own backyard.

Happy building and happy playing in your new and personal playground. Have fun!

Create Your Own Greenhouse

Have you wanted to create your own greenhouse? Not sure how? Well these tips and ideas from Custom Made will help you make your greenhouse a reality.

A couple of good reasons to have greenhouse are:

  • It might get too cold to grow certain types of plants. If you have a greenhouse it will allow temperature control to allow you to grow plants that would die if it got frost or too cold.
  • Allow you to grow seeds and young plants. It is always sad and annoying when you try and establish a plant and it dies for a number of reasons, the temperatures outside were too much for it, or you went on holiday and it got neglected. Having a greenhouse will let the young seedlings and plants thrive to then relocate in the garden or you can keep in your greenhouse.
  • Having a controlled environment helps kids learn more about gardening. As said in point two, if your seedlings die it might discourage the kids. Seeing the plants grow from strength to strength will help foster the love of gardening and children will want to do more and more.

What do you need to create your own greenhouse?

  • Flat head shovel, rake
  • Pressure-treated boards for base frame
  • Landscape fabric
  • Landscape staples
  • Heavy duty staples
  • Pea gravel

The great infographic from Custom Made shows you the steps to create your own greenhouse. Don’t forget to have the right garden tools for the kids. Once the your greenhouse is up and running the kids will want to get busy planting. Our Little Green Fingers Gardening Tool Set is just right for little hands and will be the perfect addition to your brand new greenhouse!

Greenhouse Dreams
Infographic by CustomMade

We hope you have fun creating your own greenhouse and your plants love it too! Let us know how it goes and what you plant in your greenhouse.

Thanksgiving Craft for Kids

Pilgrims giving thanks. Image courtesy of debspoons at FreeDigitalPhotos.net

If you are a school teacher or just a busy parent, Thanksgiving coloring pages can be a lifesaver when you are looking for a way to keep your child occupied for a certain period of time.  You can find Thanksgiving coloring pages in many places on the Internet that are free for download directly to your printer.

Do you want some suggestions for web sites that you can go to so you can find Thanksgiving coloring pages?  Well, I think I can help you.   Here are some of my most favorite sites:

  • http://www.enchantedlearning.com/crafts/thanksgiving/ – not only does this site have many Thanksgiving coloring pages, but they also offer coloring pages for other holidays as well as some great craft ideas for you to use year-round.  This web site is, by far, the best resource you will find for not only Thanksgiving coloring pages, but also for learning activities and crafts as well.  Of course, that’s my opinion!
  • http://www.coloring-page.com/thanksgiving.html – we like this web site because it has lots of coloring pages but it also has lots of interactive learning activities including some that help children learn to read, learn about phonics, and lots of other helpful ways to learn about other subjects.
  • http://www.apples4theteacher.com/coloring-pages/thanksgiving/ – with lots and lots of Thanksgiving coloring pages as well as other holiday coloring pages and resources for teachers and home schooling parents, this is a great web site to find help with all kinds of subjects from art to history to geography.  Many think that teaching across the curriculum (incorporating all subject areas into a lesson plan) is a great way to help a child learn.  This web site will certainly help in that area!

The best part about Thanksgiving coloring pages and other holiday coloring pages is that not only can they be colored and displayed, but they can also serve as templates for other crafts.  If you are looking for a picture of a pilgrim to make a craft from, look for Thanksgiving coloring pages and use the picture as a guide.

Kids craft sites with great things for Thanksgiving:

There are many other web sites out there with free printable Thanksgiving coloring pages.  Just search with your favorite search engine and then pick the site that best fits your needs!

From all of us at Happy Caterpillar, we wish you all a Happy Thanksgiving.

Keeping Your Halloween Party Budget Friendly

Halloween parties can be fun for all ages, but they can also become expensive quickly if you do not have a budget in mind. And while everyone wants to invite all of their friends, the more people, the more money the party costs. After all, you have to figure in the decorations, entertainment, food, and costumes. However, with the right planning you can create the perfect Halloween party on any budget.

Make it a potluck

Potlucks are a great idea for any party. For starters, you do not have the work and expense of creating multiple dishes yourself. You also get the advantage of trying new and different recipes. It is often easiest to make the main dish yourself, and assign dishes to different party goers (for instance, asking one family to bring a side dish, another dessert, another salad, etc.). You can also make your Halloween party snacks or desserts only.

Plan ahead and shop on sale

If you host an annual Halloween party, paper supplies and decorations can often be bought cheaply in November for the following year. If this is your first year hosting a Halloween party, start buying as soon as Halloween merchandise starts hitting the shelves so that you can take advantage of the lower prices and better selection.

Halloween Table Setting. Image courtesy of Apolonia at FreeDigitalPhotos.net

Look for items that can be used more than once

If you can get two uses out of one item, you have saved money right there. Pumpkins that are painted or left natural (no carving) can be used to make baked goods after the guests have gone home. Fall decorations can work just as well in November as in October, provided that there is nothing specifically Halloween about them. Also look for Halloween decorations that can be reused from one year to the next. That way, if you do invest much money this year, you won’t have to next year.

Small and intimate beats large and loud

While a large party involving the entire neighborhood may sound like fun, the amount of money that it will cost, let alone the amount of room that you will need, can make this a bit prohibitive. Consider making the party for adults only, or limit to only the families that you are closest with.

Shop at warehouse stores

Buying in bulk is often less expensive, especially when you need to buy a large amount of items. Candy, paper goods, and treats for the goodie bags can often be found for less than you would pay at the department stores.

Chances are, if you spend more money on your Halloween party than you were intending, it is only going to stress you out. So by shopping smart and planning ahead, you can have just as much fun without the stress.

Halloween Crafts for Kids

Pumpkin ready to paint for Halloween. Image courtesy of Michael Elliott at FreeDigitalPhotos.net

Many kids love Halloween. There are parties, costumes, and every kid’s favorite – candy. Trying to keep kids entertained until Halloween night can require the patience of Gandhi himself. Here are some easy Halloween crafts that you can use to keep the kids entertained.

Puppets

Ghost puppets are easy to make and can inspire hours of creative play. Get a white handkerchief, black marker, and a rubber band. Drape the handkerchief over your child’s middle three fingers, secure with a rubber band, and draw on eyes and a mouth with the marker. You can also put the cardboard from a paper towel roll and stuff the head with cotton balls if you want a more permanent puppet.

Lollipops

If you are planning on handing out lollipops as part of your treats for trick-or-treating, you kids can help you decorate them. Cover the lollipop with a tissue, tying securely with a rubber band or piece of ribbon. Use a marker to draw eyes and mouth on your ghosts and they are ready for giving.

Spider webs

Take 3 craft sticks and glue them together so that they make a star shape. Taking white or black yarn, weave it over one craft stick and under the next, working your way outwards from the center. When it is finished, glue down the end and attach a plastic spider. Your creation is now ready for hanging.

Candy Cauldrons

Find an empty plastic container and paint it black. You will also need to paint three small wooden balls black as well. Once everything is completely dry, glue the balls to the bottom of the cauldron. Add a wire handle if you would like, and fill your cauldron with your favorite Halloween candies.

Paint a pumpkin

Pumpkin carving is a bit messy and difficult, and can be dangerous if you do not want small children handling the knife. Instead, get some permanent markers or acrylic paint your pumpkin to look like a monster, clown, or other Halloween character. For kids, the smaller “pie pumpkins” or even the mini-pumpkins will work perfectly for this craft.

Paper plate masks

While your child may not be able to dress up in their costume until the day or evening of Halloween, you can easily create your own masks. Help your child cut eyes and breathing holes out of a paper plate. Punch a hole on either side to attach a ribbon or string to tie the mask on. Then you can allow your child to decorate the mask with crayons, marker, paint, or by gluing items to it.

Family celebrating Halloween. Image courtesy of stockimages at FreeDigitalPhotos.net

Reusable treat bags

Purchase some reusable cloth totes or shopping bags as well as some Halloween-colored fabric paint. You can also look for iron-on transfers and stencils to make decorating easier. Allow your kids to decorate their own bag. If you do this a few days before Halloween, it will be dry and ready to go along when trick-or-treating.

A little creativity and you can come up with your own Halloween crafts for kids as you wait to celebrate.

Fall Planting

Beautiful Chrysanthemum. Image by Satdeep Gill
Colorful Maple Tree in Fall. Image courtesy of num_skyman at FreeDigitalPhotos.net

Most people don’t think of Fall as a time for planting new landscaping and garden plants. To most, it’s time to put garden ventures to sleep until Spring. While it may not seem so, Fall planting of trees, shrubs, Perennials, bulbs, and cool weather grasses like Fescue is a very good idea.

Roots of newly planted plants and trees can continue to grow and become established in temperatures as low as 40 degrees. And since the roots don’t have to supply the rest of the plant with energy to grow, more energy is focused on root production.

Come Springtime, because of an established root system, plants shoot out of the ground with plenty of energy for top growth.

Soil Temperature

Planting in the fall, soil temperatures are still warm from a long Summer. The warmer soil temperature encourages root growth.

In the Spring, the soil is still cool from the Winter and roots are very slow to become established. Even if you grow plants from seed indoors and transplant outside when the temperature warms, new sprouts still don’t have the advantage of Fall planted plants.

When Exactly Is Fall?

The Fall season officially begins with the equinox in late September. However, Fall weather varies considerably from one part of the country to the next.

Basically, the best period for fall planting is around six weeks before the first hard frost in your area. You can get an idea of the average first frost date near your area from here: http://www.almanac.com/garden/frostus.php. Just keep in mind that the roots need to have time to become established before Winter sets in.

Yellow Marigolds. Image courtesy of sritangphoto at FreeDigitalPhotos.net

Autumn Bloomers

Fall isn’t just a time to put the garden to sleep and start getting ready for Spring. The growing season isn’t quite over yet.

You can add color and new life to the garden by replacing dying Summer Annuals and Perennials with Autumn blooming plants like Pansies, Chrysanthemums, and Ornamental Cabbage and Kale, Marigolds, and others.

It’s also the time to plant spring flowering bulbs and divide Perennials.

Create A Reading Garden

Community reading gardens are taking root across America.

Here are some helpful hints for creating a reading garden in your backyard.

Essentials include a clear area, a bench or hammock, shade and light and flowers and plants for inspiration and beauty. Think of color, shape, contrast and scent.

Hammock waiting to be used! Image courtesy of EA / FreeDigitalPhotos.net

Start by clearing out debris, sticks, stones and weeds. A vibrant lawn sets the stage. For mowing larger areas, a zero-turn rider, like the Troy-Bilt RZT 50, reduces time and effort. You can go forward, backward and cut around landscaping and trees.

A lawn tractor can help quickly mow and mulch and haul materials. A string trimmer trims under and around bushes, trees and fences. Tillers create rich, workable soil by cutting into it and turning under vegetation and compost.

Consider whether you want to spend more time reading or gardening, and choose high-or low-maintenance flowers and plants.

For privacy and quiet, try a hedge or screen of ivy. A border of flowers, plants, stones or shrubs can set off your outdoor “reading room.” If there’s no tree for shade, try taller shrubs, bushes or ivy on a trellis.

Relaxing with a good book in the garden. Image courtesy of phasinphoto / FreeDigitalPhotos.net

The final step is the simplest.

Open up a book and experience the beauty and inspiration of your reading garden. Enjoy!

Ease Bug Bites with Easy Herbs

Summertime means insect bites and stings. Ouch! Take a leaf from Susun S. Weed‘s storehouse of natural remedies: Soothe, heal, and prevent bites with safe herbal remedies that grow right where you live: north or south, east or west, city or country. The best natural remedies for insect bites are right underfoot.

Plantain, also called ribwort, pig’s ear, and the band-aid plant, is a common weed of lawns, driveways, parks and playgrounds. Identify it by the five parallel veins running the length of each leaf. (Most leaves have a central vein with smaller ones branching out from it.) You may find broad leaf plantain (Plantago majus), with wide leaves and a tall seed head, or narrow leaf plantain (Plantago lanceolata), with long thin leaves and a small flower head that looks like a flying saucer. Many Plantago species have seeds and leaves that can be used as food or medicine. A South American variety (Plantago psyllium) is used to make Metamucil.

How to use plantain?

Make a fresh leaf poultice. Pick a leaf, chew it well and put it on the bite. “Like magic” the pain, heat, and swelling – even allergic reactions – disappear, fast! (Yes, you can dry plantain leaves and carry them in your first aid kit. Chew like you would fresh leaves.)

Maple Leaves. Image courtesy of num_skyman / FreeDigitalPhotos.net

Poultices ease pain, reduce swelling, and help heal. No wonder they’re the number one natural choice for treating insect bites, bee and wasp stings.

  • Mud is the oldest and simplest poultice. Powdered white clay, which should be mixed with a little water or herb tea, can be applied directly to the sting as soon as possible. Clay can be kept on hand at all times and is less likely to contain fungal spores than the real thing. Finely ground grains such as rice or oatmeal, or bland starchy substances like mallow root, grated potato, or arrowroot powder are also used as soothing poultices to ease itching and pain from insect bites.
  • Fresh-herb poultices are a little more complicated, but not by much. Just find a healing leaf, pluck it, chew it, and apply it directly to the sting/bite. If you wish, use a large leaf or an adhesive bandage to hold the poultice in place. Plantain, comfrey (Symphytum uplandica x), yellow dock (Rumex species), wild geranium (Geranium maculatum), wild mallow (Malva neglecta), chickweed (Stellaria media), and yarrow are only a few of the possibilities.

In the woods, you can take a leaf from a tree, chew it and apply that to the bite. Any tree will do in an emergency, but if you have a choice, the best leaves are those from witch hazel, willow, oak or maple. Play it safe: learn to recognize witch hazel (Hamamelis virginia) and willow (Salix species) leaves before you chew on them. Maple (Acer) or oak (Quercus) leaves are easier to recognize and safer to chew – unless you live where poison oak grows. If uncertain, avoid all shrubs and any trees with slick or shiny leaves. If the leaf you are chewing tastes extremely bitter or burns your mouth, spit it out at once.

How to repel ticks, mozzies and black flies

To repel ticks, mosquitoes, and black flies, try a diluted tincture of yarrow (Alchellia millefolium) flowers directly on all exposed skin. A recent US Army study showed yarrow tincture to be more effective than DEET as an insect repellent.

Mosquito Biting Hand. Image courtesy of SweetCrisis / FreeDigitalPhotos.net

 If you’ve spent the day in an area where lyme disease is common, take a shower right away and scrub yourself with a bodybrush. Have a friend check you out for ticks. Also, it takes the tick some time to make up its mind where to bite, so most are unattached and will wash off.

“If the worst happens and I do get a bite, I help my immune system by taking a daily dose of 2-6 dropperfuls of Echinacea tincture. I avoid Goldenseal as I believe it could have adverse effects. If I have symptoms, I use a dropperful of St. John’s wort (Hypericum) tincture three times a day to ensure the lyme’s organism is inactive.” Susun S. Weed

Fragrant Flowers

A lot of money is spent in this country to reproduce fragrances for perfumes and air fresheners. The majority of these manufactured fragrances have alcohol and other additives that can actually irritate the membranes in your nose. Nature has done it the best and these are some of the most heavenly fragrances you’ll ever smell.

1) Hyacinth

This highly fragrant flower is actually a member of the lily family. Lily’s tend to grow much larger than the hyacinth but if you look closely at this flower you will see that the clusters of these blooms are tubular in shape just like the lily. Hyacinths have been a popular garden flower since the 17 hundreds because of the brilliance of there color (of every shade) and because of the incredible fragrance they have. Whether you have them planted out doors or in a pot in your home, this beautiful flower will brighten up any space and give off a constant heavenly fragrance, but, it is not overpowering. I just can’t imagine a perfume that smells any better than this. And men, instead of giving her some fresh cut flowers, try giving her a hyacinth plant. It will last longer and she can replant it again next year if she wants to put it in a garden.

Blue Hyacinth.  I just love the vibrant blue and the smell! Image courtesy of digidreamgrafix / FreeDigitalPhotos.net
Blue Hyacinth. I just love the vibrant blue and the smell! Image courtesy of digidreamgrafix / FreeDigitalPhotos.net

2) Casa Blanca and the dark pink Stargazer lily

The most fragrant flowers are the pure white Casa Blanca and the dark pink Stargazer lily. They are absolutely beautiful, but beware; the fragrance they give off is so strong, that, one bouquet of lilies can fill up an entire room. Don’t place them where you are going to sit for any length of time unless, that is what you want. They don’t do well in direct sunlight or drafts so place them in a more diffused lit area. If you replace the water every couple of days and add flower food plus a new snip of the ends, you’ll have a long lasting, beautiful fragrant arrangement.

3) Tuber roses

Tuber rose are not actually roses. Like the hyacinth, a tuber rose has a stem with clusters of flowers that are all white. Once again, the smell is fantastic. I once picked off one little petal from the cluster and put it in my car. A few hours later I return to my vehicle and was pleasantly surprised at how wonderful it smelled. My children noticed it as well. It was the perfect natural air freshener.

4) Gardenias

These flowers that bloom on trees have a very short life after they are cut, but for the little time you have them in your home is worth it. Generally gardenias are made into a corsage for special occasions, but if you don’t want to do that, you can place the flower in a low dish of water and then just leave them alone to do their work.

Gardenia has such a lovely perfume. I love it! Image courtesy of panuruangjan / FreeDigitalPhotos.net

5) Peach colored Oceana rose or the Sterling Silver rose

There are some roses that have been bred for their fragrance such as the peach colored Oceana rose or the Sterling Silver rose (which is actually purple). Each of these have a light perfume to them. Any of the purple roses have a wonderful smell.

You can order any of these flowers from your local florist. If they don’t have them on hand you can ask them to order some for you. In most cases, if you place an order before noon, you should be able to pick them up later in the afternoon.

Rather than putting chemicals in the air, you may want to get some flowers now and again and enjoy nature’s perfume.

Enjoy!

Tomatoes: Apples Of Love

greentomatoesNative to the Andean region of South American and under cultivation in Peru in the sixteenth century, tomatoes (Lycopersicum esculentum) have been grown for thousands of years. The Spanish introduced them to the European cultures. Europeans were not open to trying tomatoes until the end of the sixteenth century, as tomatoes, being part of the nightshade family, were considered poisonous.

Later, the French tried them and began to call them “pommes d’amour”, apples of love. They felt that tomatoes carried aphrodisiac qualities. It wasn’t until the 1900’s when the tomato gained popularity in North America.

Scientific research shows the health benefits from this tasty fruit. In recent years, researchers discovered that tomatoes were natural sources of the element lycopene. This antioxidant has been shown in tests to dramatically reduce the risk of cardiovascular disease and many cancers, including prostate and colon cancers. Tomatoes are an excellent source of phytochemicals, nutrients, fiber, and contain practically no fat or sodium.

They are significant sources of vitamins A, B, and C and a source of iron and potassium. In fact, one medium-sized tomato provides 20 percent of the daily-recommended value of vitamin A and 40 percent of the daily-recommended value of vitamin C.

Tomatoes are very easy to grow from seeds. In all, there are more than 100 types of tomatoes to choose from. Though most people believe ripe tomatoes are red, they actually come in many colours, including green, yellow, purple — even striped.

Unless you grow your own, you will not have the opportunity to experience the many varieties. If you don’t have the time, buy tomato plants from garden centres. Look for different varieties as they are becoming more readily available from growers.

Six to eight weeks before transplanting, start tomato seeds by filling a seedling flat with a good quality seedling mixture. Use an excellent quality potting soil from the garden centre to make sure the soil is sterilized and has a high percentage of sphagnum peat moss and perlite. Don’t use garden soil, as it tends to become hard and inhibits proper rooting of seedlings, and it may contain insects, disease, weed seeds, or chemical residue.

Tips on Growing Tomato Seeds

  • Tomato Plant Seedling. Image courtesy of Simon Howden / FreeDigitalPhotos.net
    Tomato Plant Seedling. Image courtesy of Simon Howden / FreeDigitalPhotos.net

    Sow seeds no deeper than the thickness of the seed: sprinkle the seeds onto the soil-filled flat and press them down gently.

  • Cover the seeds with a thin layer of fine, horticultural-grade vermiculite to prevent drying.
  • Water just enough to moisten the soil with a fine mist spray such as the sprayer on the kitchen sink or a mister bottle.
  • Keep the seeds evenly moist to ensure the mixture never dries out as both germinating seeds and seedlings are very intolerant of dry soil and will die if they are dry for even a short time.
  • Cover the flat or pot with plastic wrap or a clear plastic bag.
  • Remove the plastic as soon as seedlings emerge.
  • Tag each container with the date planted and the tomato variety.
  • To promote rapid germination, place the flat on a heated table, top of the refrigerator, or a heat register.
  • Once they germinate and seedlings begin to appear, move them from the heat source into a location with lots of light.
  • They need very high light levels to grow properly: a south-facing window without blinds or curtains is ideal. Use grow lights to enhance growth. Hang the lights 6 inches (15 cm) from plants and leave lights on for 14 hours a day.
  • Transplant the seedlings into larger, individual containers once the first ‘true’ leaves appear.
  • After transplanting, fertilise once a week with a plant-starter fertilizer such as 10-52-10 at ¼ strength. As an organic gardener, I do not use commercial fertilizer, only fish fertilizer on my transplants. They are strong, healthy plants and are fed weekly until moved outdoors.
  • Harden-off and plant them very deeply where the stems will develop roots helping the plant become established.
  • Tomatoes are heavy feeders and need ample quantities of compost or decomposed manure.
  • Mulch and water in dry weather to maintain soil moisture and stave off wilt disease and blossom-end rot. Blossom-end rot is caused by water stress or calcium deficiency. Watering regularly and evenly is the key to preventing blossom-end rot.
  • Never water tomatoes from the top. Water tomatoes from below and water deeply.
  • In the garden, tomatoes are compatible with chives, onion, parsley, marigold, nasturtium, and carrot. Tomatoes and all members of the Brassica family repel each other and should be kept apart. Plant garlic between tomato plants to protect them from red spider mites.
  • Tomatoes will protect roses against black spot.

Tomato Plants. Image courtesy of Simon Howden / FreeDigitalPhotos.net

How to Make a Spray For Roses

To make a spray for roses, place tomato leaves in your vegetable juicer, add 4 or 5 pints of water and 1 tablespoon of cornstarch. Strain and spray on roses when it is not convenient to plant tomatoes as companions. Label and keep any unused spray in the refrigerator.

Tomatoes Have a Variety of Uses

In the kitchen, tomatoes can be used for salads, soups, juices, sauces, stews, baked dishes, sandwiches, stuffed, grilled, broiled, pasta dishes, and salsa. They combine well with meat, fish, poultry, pasta, rice, as well as other vegetables.

Store tomatoes at room temperature. To ripen green tomatoes, place in a brown paper bag with an apple at room temperature for several days. If fresh tomatoes aren’t available, use canned tomatoes or canned tomato juice, which are fine substitutes.